Introduction to Red Velvet Cake
Red velvet cake is an iconic dessert that dates back to the early 20th century. Its exact origins are a bit of a mystery, but it rose to fame during the Great Depression when food companies promoted recipes that used their products—like food coloring and cocoa powder. Some historians trace its popularity to the famous Waldorf-Astoria Hotel in New York, where a luxurious version of the red velvet cake was served to guests seeking indulgence during tough economic times.
The name “Red Velvet” comes from two main elements: the cake’s rich, red color and its soft, velvety crumb. The term “velvet” was commonly used in the early 1900s to describe cakes that had a smooth, tender texture—very different from the more coarse, bread-like cakes of the time.
Today, red velvet cake remains beloved for its unique flavor—a delicate balance of mild cocoa, slight tanginess from buttermilk and vinegar, and sweet vanilla undertones. It’s not just the flavor that makes it popular; the bright red color and fluffy cream cheese frosting make it a true showstopper for celebrations, weddings, and holidays. Few desserts capture attention like a beautifully frosted slice of red velvet cake.
What Makes Red Velvet Cake Different?
While cocoa powder is an ingredient, red velvet cake is not simply a chocolate cake dyed red. It offers a very mild cocoa flavor, subtly enhanced by the tanginess of buttermilk and a hint of acidity from vinegar. The unique chemical reaction between the cocoa powder and acidic ingredients once produced a reddish hue naturally—although today, red food coloring is typically used to boost that vibrant look.
Traditional versions relied heavily on natural cocoa and acidic elements, whereas modern recipes often incorporate richer flavors and more vibrant colors. This delicate flavor and plush texture set red velvet apart from denser, richer chocolate cakes.
Key Ingredients for the Perfect Red Velvet Cake
Crafting the perfect red velvet cake begins with choosing the right ingredients:
- Cake Flour: Provides a lighter, tender crumb compared to all-purpose flour.
- Cocoa Powder: Just a small amount, for that subtle cocoa flavor—unsweetened, natural cocoa works best.
- Buttermilk: Adds moisture and a distinctive tang that defines red velvet cake.
- Vinegar: Enhances the leavening reaction for a fluffy texture and helps brighten the red color.
- Baking Soda: Reacts with vinegar to help the cake rise properly.
- Red Food Coloring: Essential for that vibrant, signature color.
- Butter: Unsalted, for better control over the cake’s flavor.
- Sugar: Granulated sugar for sweetness and structure.
- Eggs: Provide richness, moisture, and stability.
- Vanilla Extract: Rounds out the cake’s complex flavor profile.
Notes on Ingredient Quality:
When choosing cocoa powder, stick to natural (not Dutch-processed) because it reacts better with baking soda and vinegar. For food coloring, gel-based colorants offer a richer red without thinning the batter too much, while traditional liquid food coloring also works well if used generously.
Equipment You’ll Need
Making a perfect red velvet cake is easier with the right equipment:
- Mixing Bowls: Several sizes for dry and wet ingredients.
- Hand or Stand Mixer: For creaming butter and sugar effectively.
- Sifter: To aerate dry ingredients and ensure a smooth batter.
- 9-inch Cake Pans: Two pans for even layer baking.
- Parchment Paper: For lining pans and easy cake removal.
- Cooling Rack: To cool cakes quickly and prevent sogginess.
Having everything ready beforehand (mise en place) ensures a stress-free baking experience.
Step-by-Step Red Velvet Cake Recipe
Preparation
Preheat your oven to 350°F (175°C). Grease two 9-inch round cake pans and line them with parchment paper.
Mix Dry Ingredients
In a large bowl, sift together cake flour, cocoa powder, baking soda, and a pinch of salt. Sifting is crucial—it removes clumps and helps create a light, uniform batter that leads to a tender crumb.
Cream Butter and Sugar
Using a stand mixer or hand mixer, beat the softened butter and sugar together on medium-high speed until pale and fluffy, about 3 to 4 minutes. Proper creaming traps air in the batter, helping the cake rise and keeping it light.
Add Eggs and Flavoring
Add eggs one at a time, beating well after each addition. Then mix in the vanilla extract. Make sure each egg is fully incorporated before adding the next to avoid curdling the batter.
Alternate Mixing Wet and Dry
On low speed, add the dry ingredients to the butter mixture in three additions, alternating with the buttermilk in two additions (start and end with dry ingredients). This method ensures a well-hydrated, even batter without overmixing, which could lead to a dense cake.
Color the Batter
Mix the red food coloring and vinegar together in a small bowl, then gently fold it into the batter. The batter should be vibrantly red. If needed, adjust with a few extra drops of food coloring.
Pour and Bake
Divide the batter evenly between the two pans. Smooth the tops with a spatula. Bake for 25 to 30 minutes, or until a toothpick inserted in the center comes out clean. Avoid opening the oven door early to prevent sinking.
Cooling and Preparing for Frosting
Allow the cakes to cool in the pans for 10 minutes. Then turn them out onto a wire rack to cool completely. Frost only after the cakes are completely cooled to prevent melting the frosting.
Tips for the Best Red Velvet Cake
- Room-Temperature Ingredients: Make sure your butter, eggs, and buttermilk are at room temperature for a smooth batter and even baking.
- Don’t Overmix: Mix just until the ingredients are incorporated. Overmixing develops gluten, leading to a dense cake.
- Baking Time: Check the cakes at the minimum baking time. Overbaking dries them out.
- Cooling Completely: Never frost a warm cake. Cooling prevents the cream cheese frosting from melting and sliding off.
- Use High-Quality Cocoa: A rich, natural cocoa enhances flavor without overpowering the delicate balance that makes red velvet so special.
Traditional Cream Cheese Frosting Recipe
No red velvet cake is complete without its signature topping: rich, tangy cream cheese frosting. Here’s how to make it from scratch:
Ingredients:
- Cream Cheese: 8 oz, softened
- Butter: ½ cup (1 stick), softened
- Powdered Sugar: 3½ to 4 cups, sifted
- Vanilla Extract: 1 to 2 teaspoons
Instructions:
- In a large mixing bowl, beat the softened cream cheese and butter together until smooth and creamy—about 2 to 3 minutes on medium speed.
- Gradually add the powdered sugar, about 1 cup at a time, beating well between each addition.
- Once all the sugar is incorporated, add the vanilla extract and beat until fluffy and smooth.
Tips for Frosting Consistency:
- If the frosting is too thin, add a little more powdered sugar.
- If it’s too thick, mix in a tablespoon of milk or cream.
- Always frost cakes only when they are completely cool to avoid melting the frosting.
This cream cheese frosting is lusciously smooth, easy to spread, and complements the mild cocoa flavor of the cake perfectly.
How to Frost and Assemble Your Cake Perfectly
Frosting a red velvet cake isn’t just about slathering it on—it’s an art. Start by applying a crumb coat, a thin layer of frosting that traps loose crumbs. Chill the cake for about 20 minutes after the crumb coat to set it.
When layering, spread an even layer of frosting between the cakes, making sure the layers sit flat and aligned. Use an offset spatula for precision. Apply a generous final coat, smoothing it out as you rotate the cake on a turntable if you have one.
For decoration, keep it simple with a swirl pattern, or garnish the top with red velvet cake crumbs, fresh berries, or elegant piping along the edges. Clean, neat frosting showcases the beauty of the cake’s vibrant interior once sliced.
Storing and Freezing Red Velvet Cake
For short-term storage, cover the cake tightly and refrigerate it. It can last up to 5 days when properly stored. Bring it to room temperature before serving for the best texture.
To freeze, wrap individual slices or the entire frosted cake tightly in plastic wrap, followed by a layer of aluminum foil. It can be frozen for up to 2 months.
When ready to eat, thaw overnight in the refrigerator, then let it come to room temperature before serving. Freezing helps retain the cake’s moisture and flavor without sacrificing quality.
Popular Variations of Red Velvet Cake
Red Velvet Cupcakes: Perfect for parties, offering single-serving portions with the same classic flavor. Top each cupcake with a swirl of cream cheese frosting.
Gluten-Free Red Velvet Cake: Use a high-quality gluten-free baking flour blend. Add a little extra moisture (like sour cream) to avoid dryness.
Vegan Red Velvet Cake: Swap out dairy ingredients for plant-based options like almond milk and vegan butter. Use flax eggs as a substitute for eggs.
Mini Red Velvet Cakes: Use a cookie cutter to create individual layered mini cakes. Ideal for weddings, birthdays, or elegant tea parties.
Each variation offers a fun twist while keeping the beloved flavors of the original intact.
Mistakes to Avoid When Making Red Velvet Cake
- Overmixing the batter can lead to a dense, tough cake. Mix just until ingredients are combined.
- Using the wrong cocoa powder (Dutch-process instead of natural) affects both color and flavor.
- Substituting buttermilk with regular milk loses the essential tang and chemical reaction needed for texture.
- Skipping vinegar prevents the correct leavening reaction and can dull the red color.
- Incorrect oven temperature can cause dry or sunken cakes. Always preheat and use an oven thermometer if necessary.
Avoiding these mistakes ensures your red velvet cake turns out moist, vibrant, and delicious every time.
Frequently Asked Questions (FAQs)
What makes red velvet cake taste different from chocolate cake?
Red velvet cake has a much milder cocoa flavor compared to traditional chocolate cake. The addition of buttermilk and vinegar introduces a subtle tanginess, balancing the sweetness. Chocolate cakes are typically richer and more deeply flavored, whereas red velvet offers a lighter, more nuanced taste, making it unique among desserts.
Can I use beetroot instead of red food coloring?
Yes, beetroot can be used as a natural alternative to food coloring. Beet puree or beet juice offers a reddish tint, though it may result in a slightly earthier flavor. Using fresh beet juice works best to achieve a rich color without significantly altering the cake’s taste.
Why is vinegar used in red velvet cake?
Vinegar reacts with baking soda to create carbon dioxide, which helps the cake rise and become fluffy. It also enhances the red color of the cocoa powder when combined with acidic ingredients like buttermilk. Though you won’t taste the vinegar, it’s crucial for texture and traditional authenticity.
Can I make red velvet cake without buttermilk?
If you don’t have buttermilk, you can make a substitute by adding 1 tablespoon of vinegar or lemon juice to 1 cup of milk. Let it sit for about 5 minutes before using. However, real buttermilk is preferred for its flavor and texture-enhancing properties in authentic red velvet cakes.
How do you keep red velvet cake moist?
To keep red velvet cake moist, don’t overbake it and always measure ingredients accurately. Use cake flour for a tender crumb, and make sure your butter and eggs are at room temperature before mixing. Properly wrap and store the cake to prevent it from drying out, especially after slicing.
Print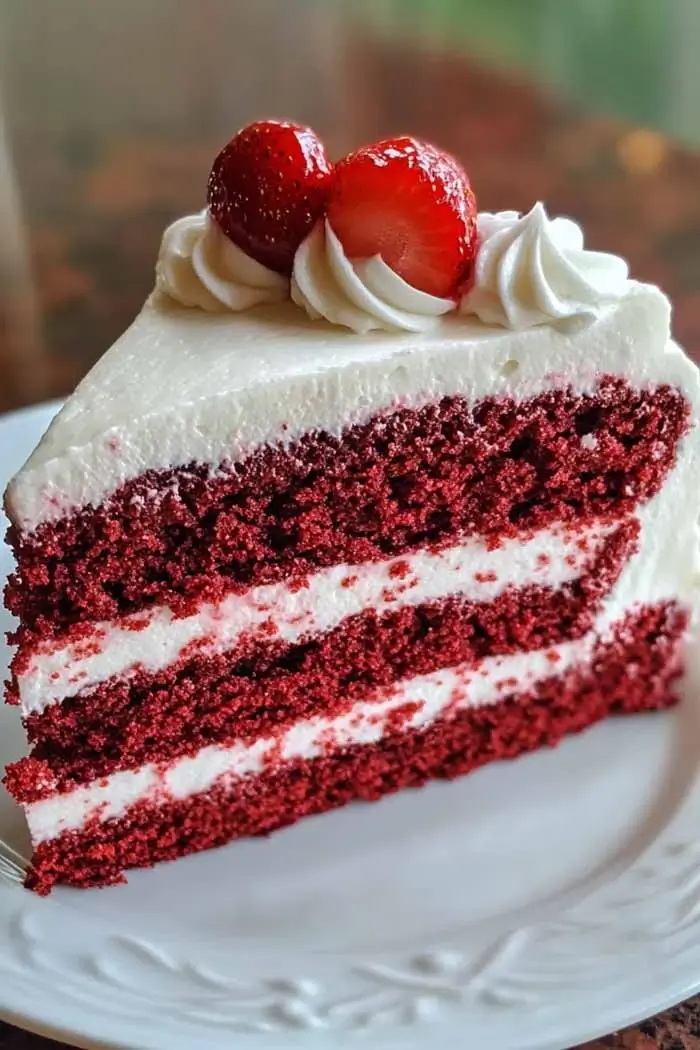
Red Velvet Cake Recipe
This classic red velvet cake is moist, fluffy, and rich in flavor, layered with smooth cream cheese frosting—perfect for celebrations and holidays.
- Total Time: 55 minutes
- Yield: 12 slices
Ingredients
- 2 1/2 cups cake flour
- 2 tbsp unsweetened natural cocoa powder
- 1 tsp baking soda
- 1/2 tsp salt
- 1/2 cup unsalted butter, softened
- 1 1/2 cups granulated sugar
- 2 large eggs
- 1 cup buttermilk, room temperature
- 1 tbsp white vinegar
- 1 1/2 tsp vanilla extract
- 2 tbsp red food coloring
- 8 oz cream cheese, softened
- 1/2 cup unsalted butter, softened
- 3 1/2 to 4 cups powdered sugar, sifted
- 2 tsp vanilla extract (for frosting)
Instructions
- Preheat oven to 350°F (175°C). Grease and line two 9-inch cake pans with parchment paper.
- In a bowl, sift together cake flour, cocoa powder, baking soda, and salt.
- Cream butter and sugar together until light and fluffy.
- Add eggs one at a time, mixing well after each. Stir in vanilla extract.
- Mix buttermilk with red food coloring in a separate cup.
- Alternate adding dry ingredients and buttermilk mixture to the butter mixture, starting and ending with dry ingredients.
- Stir in vinegar and mix until just combined.
- Divide the batter evenly into prepared pans. Bake for 25–30 minutes or until a toothpick comes out clean.
- Cool in pans for 10 minutes, then transfer to wire racks to cool completely.
- For frosting, beat cream cheese and butter until smooth. Gradually add powdered sugar, then mix in vanilla until fluffy.
- Layer and frost the cooled cakes. Decorate as desired.
Notes
- Use gel food coloring for a richer red without thinning the batter.
- Bring eggs, butter, and buttermilk to room temperature before using.
- Cakes can be made ahead and frozen (unfrosted) for up to 2 months.
- Prep Time: 25 minutes
- Cook Time: 30 minutes
- Category: Dessert
- Method: Baking
- Cuisine: American
- Diet: Vegetarian
Nutrition
- Serving Size: 1 slice
- Calories: 450
- Sugar: 38g
- Sodium: 320mg
- Fat: 22g
- Saturated Fat: 12g
- Unsaturated Fat: 9g
- Trans Fat: 0g
- Carbohydrates: 58g
- Fiber: 1g
- Protein: 4g
- Cholesterol: 75mg